The first day and we paint our plates using rotational symmetry...
Showing posts with label Forest Grove Elementary. Show all posts
Friday, June 2, 2017
Forest Grove and Bauer Elementary: Rotational Symmetry Weaving
Thursday, March 2, 2017
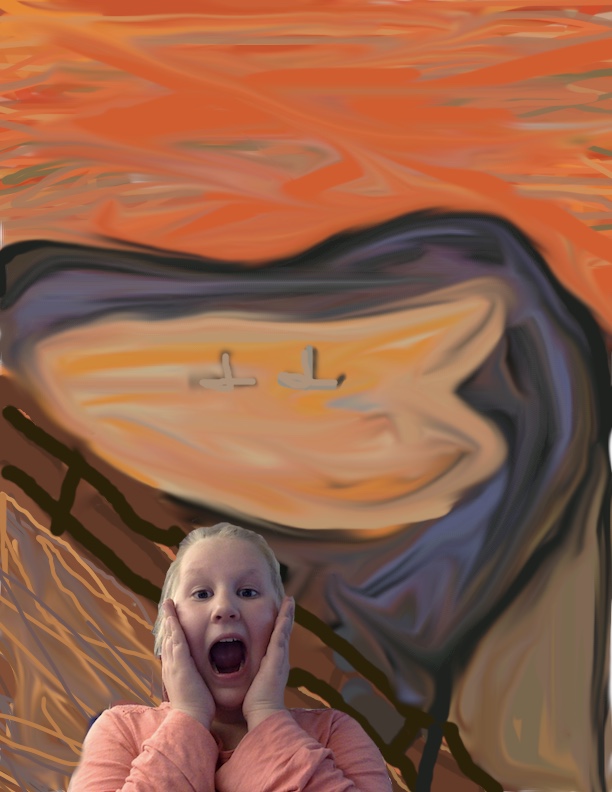
Forest Grove and Bauer Elementary: The Scream
The Scream
Fourth grade used the program "Acorn" to create their own versions of "The Scream," by Edvard Munch!
Acorn is a simplified (and somewhat glitchy) version of Photoshop. It is great to use with older elementary students because it is so close to Photoshop.
Learning Goals: I can...
- Create a file in Acorn that is US Letter sized
- Use Google Drive to download "The Scream" from a shared folder
- Use Preview to open "The Scream" and to pick colors from the original artwork "The Scream"
- Use Acorn tools and modify size and opacity: Paint brush, bucket, smudge, eraser, eyedropper
- Use Photo Booth to take a picture and insert it into Acorn
- Use layers and change visibility
- Convert Acorn file to JPEG
- Drop JPEG into a shared google folder to submit it.
Tuesday, March 24, 2015
Forest Grove and Bauer Elementary: Kandinsky Music
The kids learned that he was an artist with synesthesia. A condition in the brain where color and sound are connected. Kandinsky could hear color as music, and see color when listening to music. He is also considered to be the father of abstract art. We combined the theme of music with an abstract background full of shapes and colors.
First we practiced drawing the instruments on the back of our paper. Then we turned the instruments into a composition of 3-4 instruments with at least one pair overlapping.
After drawing final compositions onto the front of their papers, students did a serious study of the color wheel... complete with pre and post test. In addition to mixing their own colors, students were also asked to connect color mixing with math and fractions!
Here is a sample of the way we approached color mixing with math:
Color mixing is a practical application for fractions. If you don't use the right proportions of each color you just don't get the exact color that you want! For instance, when making green, if you use too much blue (a dark, powerful color) it's very hard to add enough yellow (a light, weak color) to create green. The kids were asked to remember to use two double scoops of the lightest color (4/5) and one tiny dab of the darkest color (1/5). We used these measurements as guidelines. The kids also learned the difference between indigo and violet (indigo is mostly blue while violet is closer to red on the color wheel. When you combine them you get purple).
Each student mixed their own colors on a color wheel worksheet (painters palette):
Students used popsicle sticks (our makeshift serving spoons) to scoop the primary colors out of the paint trays and onto their mixing worksheets. Then they used their brushes to do all the mixing on the sheet. This was the first project that I have used this method for, and I loved being able to have ALL the kids in charge of making ALL of their own colors! Whenever they ran out of a secondary color they had to problem solve to match the original color again! I think this helped the kids learn the color wheel very well.
We started with only primary colors...
Then the kids added their secondary color mixtures. The kids tried not to have shapes of a like color touching. This created even more problems to solve!
This was a project with so many layers of learning and problem solving! It is definitely one I will use in the coming years!
We wrote a simplified version of the learning goals listed below on the back of our art for parents to see what we're learning!
Learning Goals: I can...
- Tell about Kandinsky
- Create and abstract background using regular and irregular shapes
- Create a composition with at least one set of overlapping instruments
- Name the primary and secondary colors
- Use fractions to communicate how to mix primary colors to make secondary colors
- Explain the difference between indigo and violet
- Use good craftsmanship when painting smooth edges and outlines
- Create contrast (as opposed to camouflage) by using different colors in shapes that share a side
Friday, September 5, 2014
Forest Grove Elementary: Welcome Back Mural
Welcome back! It's been a great summer and now it's time to go back to school! These murals were painted by last year's 2nd and 3rd grade classes to welcome our students back. This was a great project for teaching students about collaborative art. Table groups worked together to make decisions about colors and details on their gigantic masterpieces! Well done kids!
Learning Goals: I can...
- Explain what a mural is
- Use art to create a welcoming environment
- Collaborate with other students on a group project
Thursday, March 6, 2014
Forest Grove and Bauer Elementary: Texture Hen Collages
Second graders read the book Bubble Gum, Bubble Gum to learn about texture. This is a fun book with great illustrations. The author uses interesting texture words.
On the first day of our project, we painted paper and talked about how to use brushstrokes to create a rough textured look for the feathers and a smooth look for the hen's coat.
Next, we talked about collage and strategies to use when using glue and scissors to create a collage.
Here are some sayings we use in the art room for good craftsmanship!
Glue: "Just a dot, not a lot!"
Scissors: "Turn the paper, not the scissors! Scissors always point, up, up and away!"
Finally, we added the background using oil pastel to make it appear like dirt texture (visual texture) and rocks so that we could actually feel the texture (tactile texture).
Learning goals: I can...
- Create texture
- Create a collage
- Use good craftsmanship
- Create texture
- Create a collage
- Use good craftsmanship
Sunday, March 2, 2014
Forest Grove and Bauer Elementary: Farms and Forms
Wow! First graders continue to amaze me with their skills! The only tool we used to create these drawings was a parallelogram stencil! I decided I would give each child their own parallelogram to trace since the parallelogram is the hardest part of drawing a cube. This was a new shape for most students and we certainly discovered how useful it could be!
First we traced the parallelogram in the middle of the paper. Then we used the side with the green line as a straightedge. This also gave the children a reference point for line lengths and directions. We talked a lot about line directions and relationships: horizontal, vertical, diagonal and parallel.
Check out this "how to" video I created to show you how I taught the kids this lesson! I these videos can be a great resource for other teachers and families at home!
The Barn Drawing Video: I don't like to use stencils for entire pictures. Usually, if I give one to the kids I only use them to help students understand how big to make the first shape. This was a new idea that I came up with that took stencil use to the next level! Enjoy!
First we traced the parallelogram in the middle of the paper. Then we used the side with the green line as a straightedge. This also gave the children a reference point for line lengths and directions. We talked a lot about line directions and relationships: horizontal, vertical, diagonal and parallel.
Check out this "how to" video I created to show you how I taught the kids this lesson! I these videos can be a great resource for other teachers and families at home!
The Barn Drawing Video: I don't like to use stencils for entire pictures. Usually, if I give one to the kids I only use them to help students understand how big to make the first shape. This was a new idea that I came up with that took stencil use to the next level! Enjoy!
On a step by step project like this, we always start with pencil. We do the toughest part on both sides of the paper (the barn in this example) and the kids decide which of their own drawings is best. Then they edit the better drawing. Once the kids learn to do this process (2 drawings) it helps them stay positive and keep moving forward. Even when the kids make a mistake they know they will be able to do a second drawing and edit the best one later. Usually, half the kids pick their first drawing and the other half choose their second drawing. I hope you enjoy these pictures as much as I have!
Learning Goals: I can...
- Show line directions and relationships: horizontal, vertical, diagonal and parallel
- Explain which 3D shapes (forms) were used to create this picture (cube and cylinder)
- Use a parallelogram as a tool for drawing (as a stencil, a straight edge and to estimate distances)
- Paint and color carefully
- Explain what an architect does (art careers)
Inspiration for this project came from here.
Subscribe to:
Posts (Atom)